
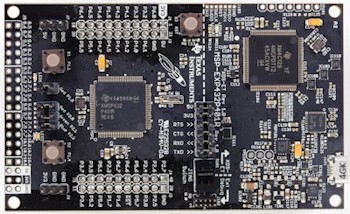
Olá pessoal, como vão? Hoje vamos testar uma placa de desenvolvimento da Texas Instruments, a MSP432 (imagem abaixo) com a IDE Energia (download aqui).
O código está abaixo e neste repositório.
/*
Created by Clovis Fritzen (clovisf AT gmail .com), from the "Button" example sketch on the Energia IDE.
This sketch controls the Texas Instruments MSP432 (ARM Cortex-M4) microcontroller,
at the MSP-EX432P401R launchpad.

- No buttons pressed, RGB led is OFF.
- Pressing S1 lights up RGB RED.
- Pressing S2 lights up RGB GREEN.
- Pressing both S1 & S2 lights up RGB BLUE.
*/

// constants won't change. They're used here to
// set pin numbers:
const int buttonPin1 = PUSH1;     // the number of the pushbutton pin
const int buttonPin2 = PUSH2;     // the number of the pushbutton pin
const int ledPin =  RED_LED;      // the number of the LED pin
const int ledPin2 =  GREEN_LED;      // the number of the LED pin
const int ledPin3 =  BLUE_LED;      // the number of the LED pin

// variables will change:
int buttonState1 = 0;         // variable for reading the pushbutton status
int buttonState2 = 0;         // variable for reading the pushbutton status

void setup() {
  // initialize the LED pin as an output:
  pinMode(ledPin, OUTPUT);
  pinMode(ledPin2, OUTPUT);
  pinMode(ledPin3, OUTPUT);
  // initialize the pushbutton pin as an input:
  pinMode(buttonPin1, INPUT_PULLUP);
  pinMode(buttonPin2, INPUT_PULLUP);

}

void loop(){
  // read the state of the pushbutton value:
  buttonState1 = digitalRead(buttonPin1);
  buttonState2 = digitalRead(buttonPin2);

  // check if the pushbutton is pressed.
  // if it is, the buttonState is HIGH:
  if (buttonState1 == HIGH && buttonState2 == HIGH) {
    // turn LED off:
    digitalWrite(ledPin, LOW);
    digitalWrite(ledPin2, LOW);
    digitalWrite(ledPin3, LOW);

  }
    else if  (buttonState1 == LOW && buttonState2 == HIGH)
    {
          digitalWrite(ledPin, HIGH);
          digitalWrite(ledPin2, LOW);
          digitalWrite(ledPin3, LOW);
    }
           else if (buttonState1 == HIGH && buttonState2 == LOW)
           {
            digitalWrite(ledPin, LOW);
            digitalWrite(ledPin2, HIGH);
            digitalWrite(ledPin3, LOW);

            } else if (buttonState1 == LOW && buttonState2 == LOW) {
              digitalWrite(ledPin, LOW);
              digitalWrite(ledPin2, LOW);
              digitalWrite(ledPin3, HIGH);
            }

}
E o vídeo do funcionamento você confere aqui:
Quer também, além do MSP432 aprender a controlar LEDs com Arduino? veja este artigo.
Pingback: Quem são os competidores do Arduino? - Fritzenlab eletrônica