
Hoje vamos aprender a programar a placa Franzininho C0 com a IDE do Arduino. Já vimos como programa-la com a IDE STM32CubeIDE neste artigo.
Baseei o tutorial neste post no portal do Embarcados, então você pode acessar o link e seguir o passo-a-passo antes de iniciar aqui. Primeiro vamos piscar um dos LEDs onboard na Franzininho C0, o LED no pino PB6.
Para efetuar a gravação da Franzininho C0 com a IDE do Arduino, precisamos coloca-la em modo gravação. Fazemos isso apertando-se primeiro o botão BOOT da placa, depois o botão RST. Por fim podemos soltar os dois botões.
Para isso vamos utilizar o código abaixo, baseado no BlinkWithoutDelay que vem acom a IDE do Arduino. Apenas alterei o “ledPin = PB6” e “interval = 100” para 100mS.
Aqui cabe um detalhe importante: normalmente nos programas do Arduino você coloca o pino 6 como “ledPin = 6”. No caso da Franzininho C0 tive que colocar o nome real do pino no microcontrolador, “ledPin = PB6”.
O código deve ser colado e compilado na IDE do Arduino (eu estou utilizando a versão 2.3.2. Ele também está no Github.
// constants won't change. Used here to set a pin number:
const int ledPin = PB6; // the number of the LED pin
// Variables will change:
int ledState = LOW; // ledState used to set the LED
// Generally, you should use "unsigned long" for variables that hold time
// The value will quickly become too large for an int to store
unsigned long previousMillis = 0; // will store last time LED was updated
// constants won't change:
const long interval = 100; // interval at which to blink (milliseconds)
void setup() {
// set the digital pin as output:
pinMode(ledPin, OUTPUT);
}
void loop() {
// here is where you'd put code that needs to be running all the time.
// check to see if it's time to blink the LED; that is, if the difference
// between the current time and last time you blinked the LED is bigger than
// the interval at which you want to blink the LED.
unsigned long currentMillis = millis();
if (currentMillis - previousMillis >= interval) {
// save the last time you blinked the LED
previousMillis = currentMillis;
// if the LED is off turn it on and vice-versa:
if (ledState == LOW) {
ledState = HIGH;
} else {
ledState = LOW;
}
// set the LED with the ledState of the variable:
digitalWrite(ledPin, ledState);
}
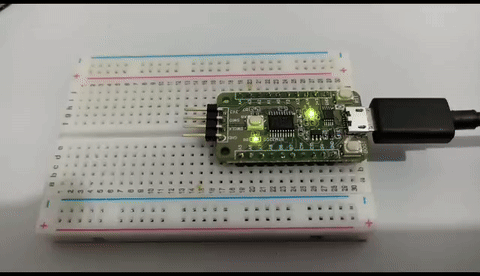
}E abaixo um gif com o código rodando na placa.
Lendo um botão (entrada digital)
Para fazer leitura de um botão vamos utilizar aquele disponível sobre a placa, conectado ao pino A8 do STM3C0. Funciona assim: ao ser pressionado botão A8, o LED do PB6 vai apagar. Ao soltar o botão o LED acende.
Observei que este comportamento é invertido em relação ao que está no código abaixo, indicando que este botão da placa da Franzininho C0 é lógica invertida.
// constants won't change. They're used here to set pin numbers:
const int buttonPin = PA8;  // the number of the pushbutton pin
const int ledPin = PB6;    // the number of the LED pin

// variables will change:
int buttonState = 0;  // variable for reading the pushbutton status

void setup() {
  // initialize the LED pin as an output:
  pinMode(ledPin, OUTPUT);
  // initialize the pushbutton pin as an input:
  pinMode(buttonPin, INPUT);
}

void loop() {
  // read the state of the pushbutton value:
  buttonState = digitalRead(buttonPin);

  // check if the pushbutton is pressed. If it is, the buttonState is HIGH:
  if (buttonState == HIGH) {
    // turn LED on:
    digitalWrite(ledPin, HIGH);
  } else {
    // turn LED off:
    digitalWrite(ledPin, LOW);
  }
}
Note que novamente precisamos colocar o nome real dos pinos, “buttonPin = PA8” e “ledPin = PB6”. Abaixo um vídeo do sketch em funcionamento.
Por hoje é só pessoal, vimos que conseguimos piscar um LED e ler um botão push-button com a IDE do Arduino. No futuro trarei ainda mais conteúdo sobre esta plaquinha, principalmente programando via STM32Cube IDE.
Want to read this content in English? click here.
Pingback: STM32C0 Franzininho with Arduino IDE - tips and tricks - FritzenLab electronics