Vamos estudar as interrupções do ESP32 no Arduino IDE, ambas (as de timer e as externas). Nosso assunto será minha placa de desenvolvimento (informações aqui) com um Xiao ESP32-C6. Há suporte oficial para ambos os modos de interrupção para ESP32-C6 no Arduino IDE. Então nossa vida é um pouco mais fácil.
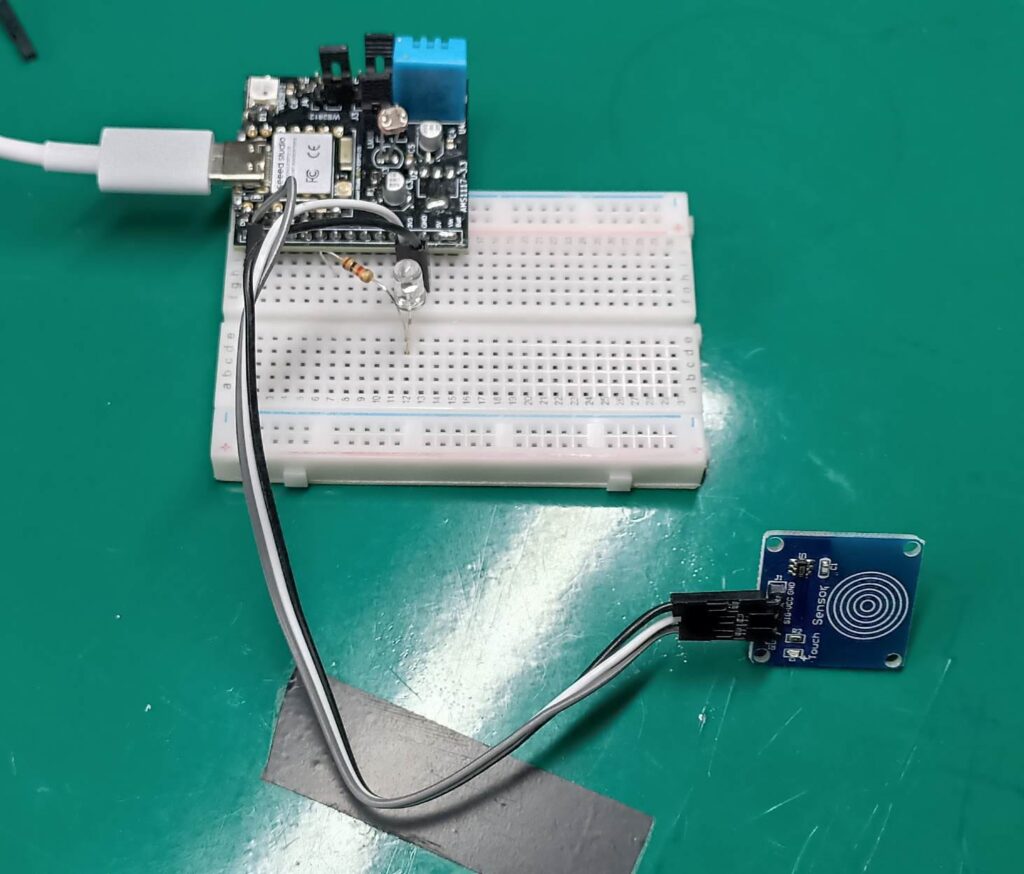
Acima você pode ver toda a configuração que usaremos neste artigo, um LED no pino D6 e um botão de toque capacitivo no pino D0.
Interrupção de hardware
Começando pelas interrupções de hardware, não consegui encontrar informações sobre quais pinos devem ser usados como interrupções de hardware. A única informação que encontrei é que no ESP32 “qualquer pino” funcionará como interrupção. Então procedi para conectar um botão de toque capacitivo ao pino D0 e funcionou.
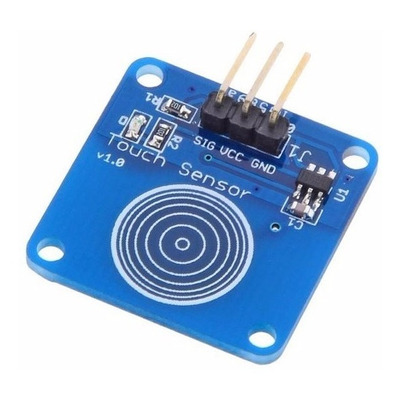
O sensor de toque capacitivo é um desses da imagem acima, que pode ser comprado aqui. Ele emite um nível lógico ALTO (3V3) com um toque e um nível lógico BAIXO (0V) sem toque.
O código é visto abaixo, tirado e adaptado desta fonte. Ele espera por uma ativação do pino D0 e imprime o número de toques até o momento no monitor serial.
// code from here https://lastminuteengineers.com/handling-esp32-gpio-interrupts-tutorial/

struct Button {
	const uint8_t PIN;
	uint32_t numberKeyPresses;
	bool pressed;
};

Button button1 = {D0, 0, false};

void IRAM_ATTR isr() {
	button1.numberKeyPresses++;
	button1.pressed = true;

}

void setup() {
	Serial.begin(115200);
	pinMode(button1.PIN, INPUT_PULLUP);
	attachInterrupt(button1.PIN, isr, RISING);
}

void loop() {
	if (button1.pressed) {
		Serial.printf("Button has been pressed %u times\n", button1.numberKeyPresses);
		button1.pressed = false;
  }
}
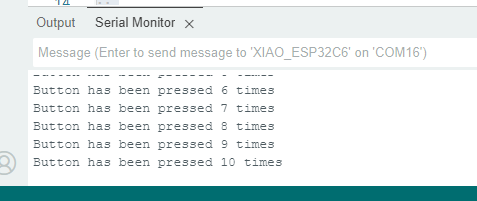
A saída do monitor serial é vista abaixo, bem simples. Mostra o número de vezes (cumulativo) que o botão do sensor foi pressionado.
A parte do código abaixo é onde a interrupção é ameaçada, um contador é incrementado e uma variável (botão pressionado) vai para alto. IRAM_ATTR é a maneira como as interrupções são tratadas no ESP32, não pergunte.
void IRAM_ATTR isr() {
	button1.numberKeyPresses++;
	button1.pressed = true;

}
Interrupções de timer
O ESP32-C6 tem dois temporizadores que podem ser usados para causar/manipular interrupções. Para este, usei o Wiki oficial do Espressif como inspiração. Ele contém um exemplo de interrupção do temporizador com um botão de parada, para cessar sua operação. Confesso que desabilitei a parte “parar” do código porque ele estava parando logo após pressionar o programa.
Adicionei um LED para que possamos ver o temporizador fazendo seu trabalho, piscando o LED. Também há atividade do monitor serial para ser vista. O código é bastante longo, como pode ser visto abaixo.
// official ESpressif example from here https://espressif-docs.readthedocs-hosted.com/projects/arduino-esp32/en/latest/api/timer.html
/*
 Repeat timer example

 This example shows how to use hardware timer in ESP32. The timer calls onTimer
 function every second. The timer can be stopped with button attached to PIN 0
 (IO0).

 This example code is in the public domain.
 */

// Stop button is attached to PIN 0 (IO0)
#define BTN_STOP_ALARM    D0
#define LED D6

hw_timer_t * timer = NULL;
volatile SemaphoreHandle_t timerSemaphore;
portMUX_TYPE timerMux = portMUX_INITIALIZER_UNLOCKED;

volatile uint32_t isrCounter = 0;
volatile uint32_t lastIsrAt = 0;

void ARDUINO_ISR_ATTR onTimer(){
  // Increment the counter and set the time of ISR
  portENTER_CRITICAL_ISR(&timerMux);
  isrCounter = isrCounter + 1;
  lastIsrAt = millis();
  portEXIT_CRITICAL_ISR(&timerMux);
  // Give a semaphore that we can check in the loop
  xSemaphoreGiveFromISR(timerSemaphore, NULL);
  // It is safe to use digitalRead/Write here if you want to toggle an output
}

void setup() {
  Serial.begin(115200);

  // Set BTN_STOP_ALARM to input mode
  pinMode(BTN_STOP_ALARM, INPUT);
  pinMode(LED, OUTPUT);
  // Create semaphore to inform us when the timer has fired
  timerSemaphore = xSemaphoreCreateBinary();

  // Set timer frequency to 1kHz
  timer = timerBegin(1000);

  // Attach onTimer function to our timer.
  timerAttachInterrupt(timer, &onTimer);

  // Set alarm to call onTimer function every second.
  // Repeat the alarm (third parameter) with unlimited count = 0 (fourth parameter).
  timerAlarm(timer, 1000, true, 0);
}

void loop() {
  // If Timer has fired
  if (xSemaphoreTake(timerSemaphore, 0) == pdTRUE){
    uint32_t isrCount = 0, isrTime = 0;
    // Read the interrupt count and time
    portENTER_CRITICAL(&timerMux);
    isrCount = isrCounter;
    isrTime = lastIsrAt;
    portEXIT_CRITICAL(&timerMux);
    // Print it
    Serial.print("onTimer no. ");
    Serial.print(isrCount);
    Serial.print(" at ");
    Serial.print(isrTime);
    Serial.println(" ms");
    digitalWrite(LED, !digitalRead(LED));
  }
  // If button is pressed
  /*if (digitalRead(BTN_STOP_ALARM) == LOW) {
    // If timer is still running
    if (timer) {
      // Stop and free timer
      timerEnd(timer);
      timer = NULL;
    }
  }*/
}
As partes mais importantes do código são a definição de frequência, no nosso caso 1000Hz:
// Set timer frequency to 1kHz
  timer = timerBegin(1000);
e o intervalo de interrupção, no nosso caso 1000 contagens. Que conectando com o pedaço de código abaixo, nos dá intervalos de um segundo:
// Set alarm to call onTimer function every second.
  // Repeat the alarm (third parameter) with unlimited count = 0 (fourth parameter).
  timerAlarm(timer, 1000, true, 0);
O código abaixo fará com que o código altere o estado do LED a cada segundo, de ALTO para BAIXO e de BAIXO para ALTO. Tudo isso sem usar nenhum delay() ou micros(), millis(). É um controle puramente interno de hardware.
Misturando as duas formas de gerar interrupções
Fiz um exemplo de mistura de interrupções externas e de timer. O LED ficará piscando pela interrupção do timer até que o botão de toque capacitivo externo o interrompa. Um novo toque no botão capacitivo reativará o piscar.
// code from here https://lastminuteengineers.com/handling-esp32-gpio-interrupts-tutorial/

struct Button {
	const uint8_t PIN;
	uint32_t numberKeyPresses;
	bool pressed;
};

Button button1 = {D0, 0, false};

void IRAM_ATTR isr() {
	button1.numberKeyPresses++;
	button1.pressed = true;

}

// official ESpressif example from here https://espressif-docs.readthedocs-hosted.com/projects/arduino-esp32/en/latest/api/timer.html
/*
 Repeat timer example

 This example shows how to use hardware timer in ESP32. The timer calls onTimer
 function every second. The timer can be stopped with button attached to PIN 0
 (IO0).

 This example code is in the public domain.
 */

#define LED D6
int buttonpressed= 0;

hw_timer_t * timer = NULL;
volatile SemaphoreHandle_t timerSemaphore;
portMUX_TYPE timerMux = portMUX_INITIALIZER_UNLOCKED;

volatile uint32_t isrCounter = 0;
volatile uint32_t lastIsrAt = 0;

void ARDUINO_ISR_ATTR onTimer(){
  // Increment the counter and set the time of ISR
  portENTER_CRITICAL_ISR(&timerMux);
  isrCounter = isrCounter + 1;
  lastIsrAt = millis();
  portEXIT_CRITICAL_ISR(&timerMux);
  // Give a semaphore that we can check in the loop
  xSemaphoreGiveFromISR(timerSemaphore, NULL);
  // It is safe to use digitalRead/Write here if you want to toggle an output
}

void setup() {
  // put your setup code here, to run once:
  Serial.begin(115200);
	pinMode(button1.PIN, INPUT_PULLUP);
	attachInterrupt(button1.PIN, isr, RISING);

  pinMode(LED, OUTPUT);
  // Create semaphore to inform us when the timer has fired
  timerSemaphore = xSemaphoreCreateBinary();

  // Set timer frequency to 1kHz
  timer = timerBegin(1000);

  // Attach onTimer function to our timer.
  timerAttachInterrupt(timer, &onTimer);

  // Set alarm to call onTimer function every second.
  // Repeat the alarm (third parameter) with unlimited count = 0 (fourth parameter).
  timerAlarm(timer, 500, true, 0);

}

void loop() {
  // put your main code here, to run repeatedly:
  if (button1.pressed) {
		buttonpressed++;
    if(buttonpressed== 2){
      buttonpressed= 0;
    }
		button1.pressed = false;
  }
  if(buttonpressed== 1){
    // If Timer has fired
    if (xSemaphoreTake(timerSemaphore, 0) == pdTRUE){
      uint32_t isrCount = 0, isrTime = 0;
      // Read the interrupt count and time
      portENTER_CRITICAL(&timerMux);
      isrCount = isrCounter;
      isrTime = lastIsrAt;
      portEXIT_CRITICAL(&timerMux);
      // Print it
      Serial.print("onTimer no. ");
      Serial.print(isrCount);
      Serial.print(" at ");
      Serial.print(isrTime);
      Serial.println(" ms");
      digitalWrite(LED, !digitalRead(LED));
    }
  }

}
Estou literalmente apenas misturando os códigos mostrados acima, interrupções externas e de timer. O vídeo abaixo ilustra o comportamento do circuito.
Estou clicando no sensor de toque capacitivo e o LED para onde está (ligado ou desligado). Outro clique de toque capacitivo e o LED volta a piscar.
Palavras finais
Interrupções são um dos recursos mais poderosos de qualquer microcontrolador, elas permitem que coisas em “tempo real” sejam executadas perfeitamente. Caso contrário, pode-se perder informações e bagunçar um sistema inteiro.
Em outra vibe, quer aprender como não usar mais delay() no seu código? Confira este artigo.



Deixe um comentário