
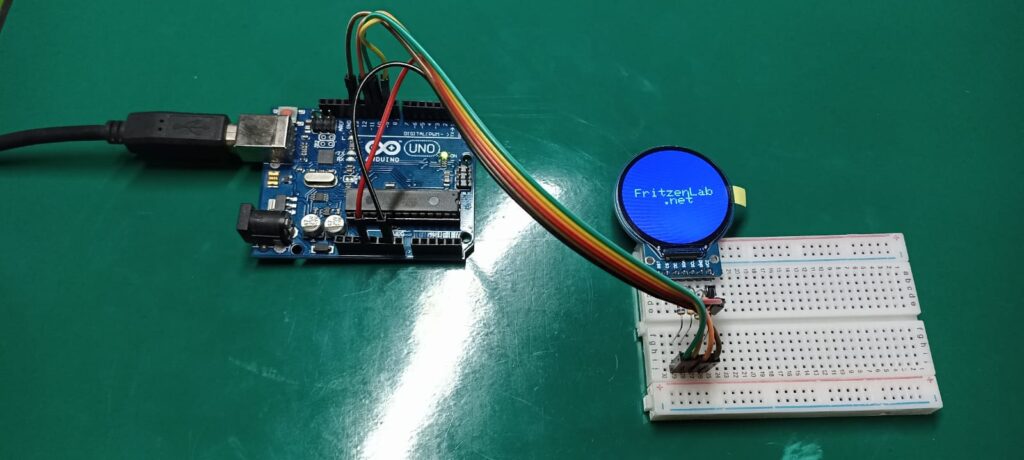
Vamos falar sobre o display LCD redondo GC9A01A 240×240, uma pequena adição bacana para a caixa de ferramentas de qualquer amador. Estamos falando de um display LCD TFT RGB de 240×240 pixels em um formato redondo. Ele se comunica com um microcontrolador via SPI e pode fazer 262k cores em modo completo; 8 cores em modo ocioso.
As conexões (hardware) são bem diretas, quatro pinos de dados mais 3V3 e GND. Quatro resistores são necessários em série com os pinos de dados porque o display é 3V3 e o Arduino funciona a 5V. Usei resistores de 680 Ohm.
| Display GC9A01A | Pinos do Arduino UNO |
| RST | Não conectado |
| CS | 10 |
| DC | 9 |
| SDA | 11 |
| SCL | 13 |
| GND | GND |
| VCC | 3V3 |
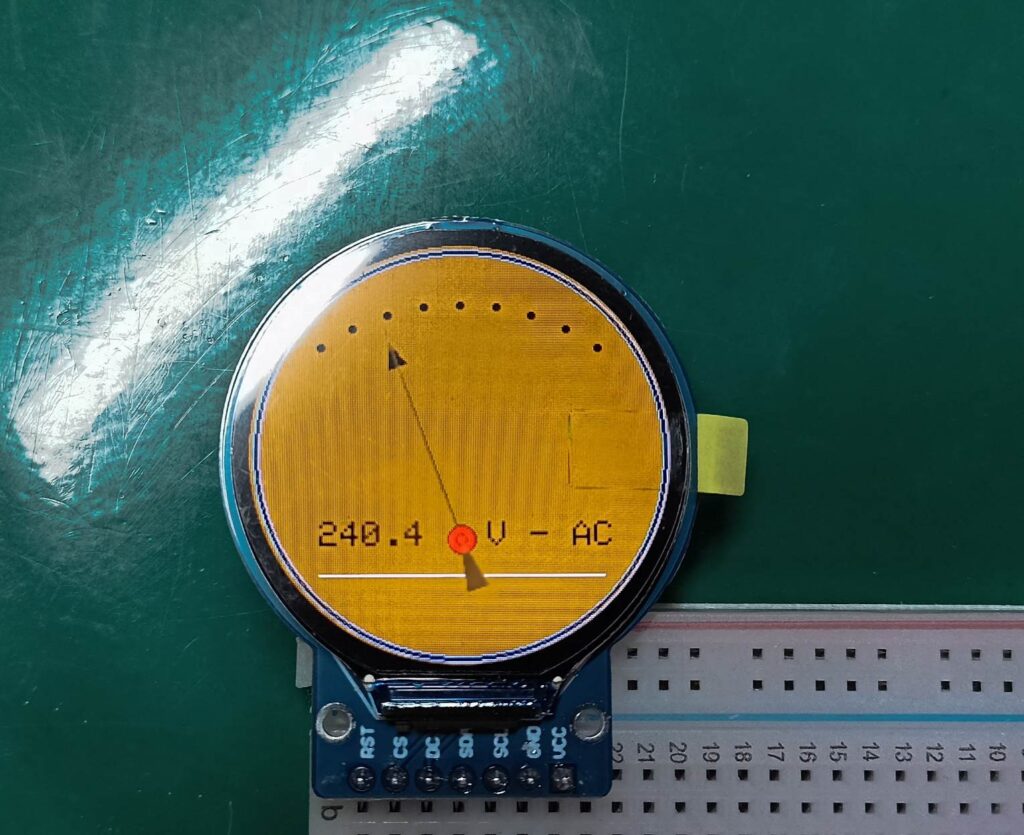
Comecei com uma demonstração deste post do blog. O código e a imagem estão abaixo, é um medidor/medidor de voltagem. Coisa bem complexa, o código não é meu.
#include "SPI.h"
   #include "Adafruit_GC9A01A.h"

   #define TFT_DC 9
   #define TFT_CS 10

   Adafruit_GC9A01A tft (TFT_CS, TFT_DC);

   #define BLACK      0x0000                                                               // some extra colors
   #define BLUE       0x001F
   #define RED        0xF800
   #define GREEN      0x07E0
   #define CYAN       0x07FF
   #define MAGENTA    0xF81F
   #define YELLOW     0xFFE0
   #define WHITE      0xFFFF
   #define ORANGE     0xFBE0
   #define GREY       0x84B5
   #define BORDEAUX   0xA000
   #define AFRICA     0xAB21                                                               // current dial color

   #define DEG2RAD 0.0174532925

   int multiplier;
   int    frametime = 1000;
   int    x_pos;
   int    y_pos;
   int    center_x = 120;                                                                  // center x of dial on 240*240 TFT display
   int    center_y = 120;                                                                  // center y of dial on 240*240 TFT display
   float  pivot_x, pivot_y,pivot_x_old, pivot_y_old;
   float  p1_x,p1_y,p2_x,p2_y,p3_x, p3_y, p4_x, p4_y, p5_x, p5_y;
   float  p1_x_old,p1_y_old, p2_x_old, p2_y_old, p3_x_old, p3_y_old;
   float  p4_x_old, p4_y_old, p5_x_old, p5_y_old;
   float  angleOffset = 3.14;
   float  arc_x;
   float  arc_y;
   int    radius = 120;                                                                    // center y of circular scale
   float  angle_circle = 0;
   float  needleAngle = 0;
   int    iteration = 0;
   int    j;
   float  volt = 220;
   int    needle_multiplier = 1;
   float  needle_setter;
                                                                                           // voltage rolling averaging stuff
   const byte nvalues = 10;                                                                // rolling average window size
   static byte current = 0;                                                                // index for current value
   static byte cvalues = 0;                                                                // count of values read (<= nvalues)
   static float sum = 0;                                                                   // rolling sum
   static float values[nvalues];
   float averagedVoltage = 235;                                                            // to start with

void setup() {

  randomSeed (analogRead(0));

   tft.begin();
   Serial.begin (9600);
   Serial.println ("");
   Serial.println ("");
   tft.setRotation (0);

   tft.fillScreen (BLACK);
   tft.drawCircle (center_x, center_y,120, BLACK);
   pivot_x = center_x;
   pivot_y = center_y+50;

   p1_x_old = center_x; p1_y_old = center_y+50;
   p2_x_old = center_x; p2_y_old = center_y+50;
   p3_x_old = center_x; p3_y_old = center_y+50;
   p4_x_old = center_x; p4_y_old = center_y+50;
   p5_x_old = center_x; p5_y_old = center_y+50;

   volt = 240;                                                                             // initial value setting the needle
   create_dial ();
   needle_setter = volt;
   needleAngle = (((needle_setter)*DEG2RAD*1.8)-3.14);
   needle();
   draw_pivot ();
}


void loop (){

   iteration++;
   Serial.println ();
   Serial.print ("iteration ");
   Serial.println (iteration);
   volt = random (230,250);                                                                // voltage simulator
   Serial.print ("simulated volt out of ZMPT101B: ");
   Serial.println (volt);
   averagedVoltage = movingAverage(volt);
   Serial.print ("averaged volt =      ");
   Serial.println (averagedVoltage);
   Serial.println ();
   Serial.println ();

   displayNumerical ();
   needle_setter = averagedVoltage;
   needle();
   draw_pivot ();

   delay (frametime);
}

void needle (){                                                                            // dynamic needle management

   tft.drawLine (pivot_x, pivot_y, p1_x_old, p1_y_old, AFRICA);                            // remove old needle
   tft.fillTriangle (p1_x_old, p1_y_old, p2_x_old, p2_y_old, p3_x_old, p3_y_old, AFRICA);  // remove old arrow head
   tft.fillTriangle (pivot_x, pivot_y, p4_x_old, p4_y_old, p5_x_old, p5_y_old, AFRICA);    // remove old arrow head

   needleAngle = (((needle_setter)*0.01745331*1.8)-3.14);
   p1_x = (pivot_x + ((radius)*cos(needleAngle)));                                         // needle tip
   p1_y = (pivot_y + ((radius)*sin(needleAngle)));

   p2_x = (pivot_x + ((radius-15)*cos(needleAngle-0.05)));                                 // needle triange left
   p2_y = (pivot_y + ((radius-15)*sin(needleAngle-0.05)));

   p3_x = (pivot_x + ((radius-15)*cos(needleAngle+0.05)));                                 // needle triange right
   p3_y = (pivot_y + ((radius-15)*sin(needleAngle+0.05)));

   p4_x = (pivot_x + ((radius-90)*cos(angleOffset+(needleAngle-0.2))));                    // needle triange left
   p4_y = (pivot_y + ((radius-90)*sin(angleOffset+(needleAngle-0.2))));

   p5_x = (pivot_x + ((radius-90)*cos(angleOffset+(needleAngle+0.2))));                    // needle triange right
   p5_y = (pivot_y + ((radius-90)*sin(angleOffset+(needleAngle+0.2))));

   p1_x_old = p1_x; p1_y_old = p1_y;                                                       // remember previous needle position
   p2_x_old = p2_x; p2_y_old = p2_y;
   p3_x_old = p3_x; p3_y_old = p3_y;

   p4_x_old = p4_x; p4_y_old = p4_y;                                                       // remember previous needle counterweight position
   p5_x_old = p5_x; p5_y_old = p5_y;

   tft.drawLine (pivot_x, pivot_y, p1_x, p1_y, BLACK);                                     // create needle
   tft.fillTriangle (p1_x, p1_y, p2_x, p2_y, p3_x, p3_y, BLACK);                           // create needle tip pointer
   tft.drawLine (center_x-80, center_y+70, center_x+80,center_y+70, WHITE);                // repair floor
   tft.fillTriangle (pivot_x, pivot_y, p4_x, p4_y, p5_x, p5_y, BLACK);                     // create needle counterweight
}


void create_dial (){

   tft.fillCircle (center_x, center_y,120, AFRICA);                                        // general dial field
   tft.drawCircle (center_x, center_y,118,GREY);
   tft.drawCircle (center_x, center_y,117,BLACK);
   tft.drawCircle (center_x, center_y,116,BLACK);
   tft.drawCircle (center_x, center_y,115,GREY);

   for (j= 30; j<75    ; j+=5)
       {
        needleAngle = ((j*DEG2RAD*1.8)-3.14);
        arc_x = (pivot_x + ((radius+15)*cos(needleAngle)));                                // needle tip
        arc_y = (pivot_y + ((radius+15)*sin(needleAngle)));
        tft.drawPixel  (arc_x,arc_y,BLACK);
        tft.fillCircle (arc_x,arc_y,2, BLACK);
        }

   tft.setTextColor (BLACK,AFRICA);
   tft.setTextSize (2);
   tft.setCursor (center_x+15, center_y+40);
   tft.print ("V - AC");
   tft.drawLine (center_x-80, center_y+70, center_x+80,center_y+70, WHITE);                // create floor
}


void draw_pivot (){

   tft.fillCircle (pivot_x, pivot_y,8,RED);
   tft.drawCircle (pivot_x, pivot_y,8,BLACK);
   tft.drawCircle (pivot_x, pivot_y,3,BLACK);
}


void displayNumerical (){

   tft.fillRect (center_x-82, center_y+40, 62,16,AFRICA);
   tft.setTextColor (BLACK);
   tft.setTextSize (2);
   tft.setCursor (center_x-80, center_y+40);
   tft.print (averagedVoltage,1);
}


float movingAverage(float value) {

   sum += value;
   if (cvalues == nvalues)                                                                 // if the window is full, adjust the sum by deleting the oldest value
     sum -= values[current];

   values[current] = value;                                                                // replace the oldest with the latest

   if (++current >= nvalues)
     current = 0;

   if (cvalues < nvalues)
     cvalues += 1;

   return sum/cvalues;
}
Há mais informações sobre o display, a ficha técnica do GC9A01A está aqui.
A biblioteca da Adafruit
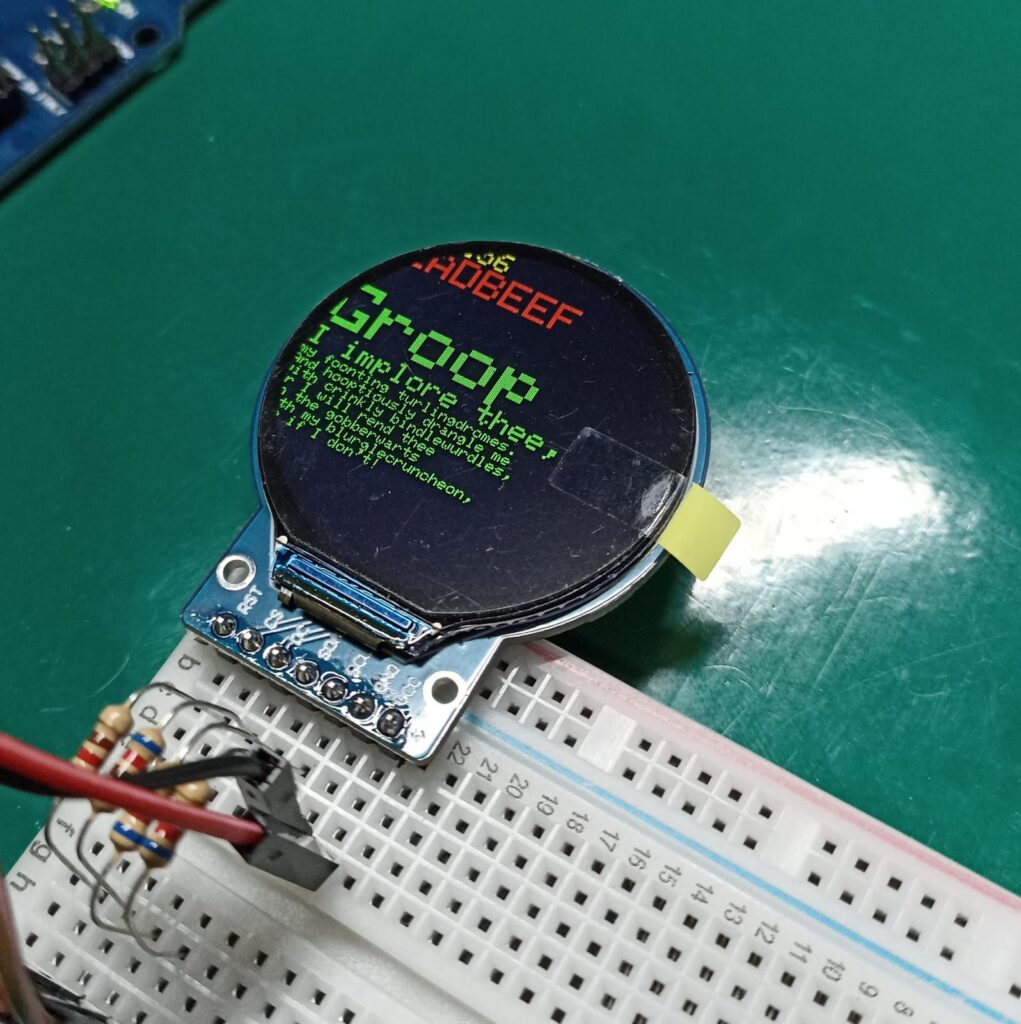
Eu também executei a demonstração do Adafruit aqui (Github). Para isso, você precisa primeiro instalar a biblioteca oficial no Arduino IDE. Vá em “Sketch > Add library > Library manager” e digite “GC9A01A”, selecione e instale o Adafruit. A imagem abaixo é de uma das telas da biblioteca Adafruit.
O código pode ser acessado no Arduino IDE em “File > Examples > Adafruit GC9A01A > graphicstest”. Lembre-se de que você precisa instalar a biblioteca como visto acima.
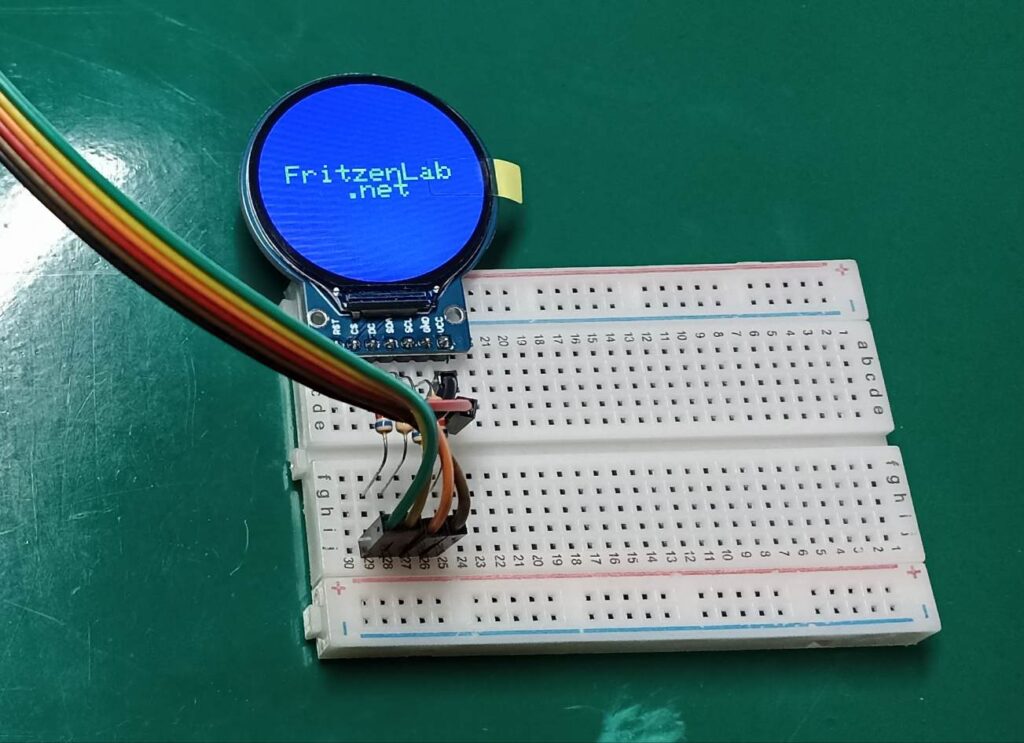
Então eu fiz um código simples para mostrar a URL do blog, como visto abaixo. Ele é baseado (e usa) na biblioteca Adafruit.
#include "SPI.h"
#include "Adafruit_GFX.h"
#include "Adafruit_GC9A01A.h"

#define TFT_DC  9
#define TFT_CS 10

Adafruit_GC9A01A tft(TFT_CS, TFT_DC);

void setup() {
  // put your setup code here, to run once:
  tft.begin();
  tft.fillScreen(GC9A01A_BLUE);
  yield();
  tft.setCursor(30, 100);
  tft.setTextColor(GC9A01A_GREEN);
  tft.setTextSize(3);
  tft.println("FritzenLab");
  tft.setCursor(90, 120);
  tft.println(".net");

}

void loop() {
  // put your main code here, to run repeatedly:


}
O resultado é bem legal:
Também melhorei um pouco animando o texto, como pode ser visto no vídeo abaixo:
#include "SPI.h"
#include "Adafruit_GFX.h"
#include "Adafruit_GC9A01A.h"

#define TFT_DC  9
#define TFT_CS 10

Adafruit_GC9A01A tft(TFT_CS, TFT_DC);

void setup() {
  // put your setup code here, to run once:
  tft.begin();
  tft.fillScreen(GC9A01A_BLUE);
  yield();


}

void loop() {
  // put your main code here, to run repeatedly:
  for(int i=0; i < tft.height(); i=i+10){
    tft.setCursor(30, i);
    tft.setTextColor(GC9A01A_GREEN);
    tft.setTextSize(3);
    tft.println("FritzenLab");
    tft.setCursor(90, i+20);
    tft.println(".net");
    //delay(10);
    tft.fillScreen(GC9A01A_BLUE);
    }
Pra finalizar
Apesar de não ser o display mais rápido de todos os tempos, ele pode fazer um pouco de animação. Vimos isso no exemplo do Gauge/meter e também na demonstração do Adafruit. Olhar para ele é legal, diferente de tantos displays que já vi por aí. Definitivamente farei um projeto com ele no futuro.
Quer saber mais sobre displays? Acabei de escrever recentemente sobre o OLED i2c de 0,96″ aqui. Além disso, se você quiser comprar seu próprio display para teste, compre o GC9A01A no meu link de afiliado Banggood.
Pingback: Display LED 7 segmentos com ESP32-C6 - Fritzenlab eletrônica