Vamos conhecer a linha Beetle ESP32-C3 da DFRobot, utilizando também um display OLED 128×64. Este display é da DFRbot, linha “Gravity” e funciona via i2c assim como este que testamos aqui.
A linha Beetle da DFRobot é minimalista, contando com placas pequenas porém poderosas. Como é o caso desta ESP32-C3 que eles me mandaram, um RISC-V rodando em 160MHz com 4Mb de memória de programa (Flash) e 400kb de SRAM (memória volátil).
Ela é capaz de rodar Bluetooth e WiFi (2.4GHz), além de 13 IOs, SPI, i2c e PWM. No caso desta placa não é possível utilizar antena WiFi externa, apenas a impressa na própria placa. Tem seis canais de conversor analógico-digital (AD) e faz DMA (acesso direto á memória).
A placa em sí (não o chip ESP32-C3) tem carregador de bateria de lítio 3,7V, então é só conectar e usar. Um recurso legal que ela também tem é receptor e emissor de infravermelho, conectável à qualquer pino.
Toda informação sobre a placa (um Wiki) está aqui, já para adquirir a mesma clique aqui.
Utilizando entrada analógica e porta i2c
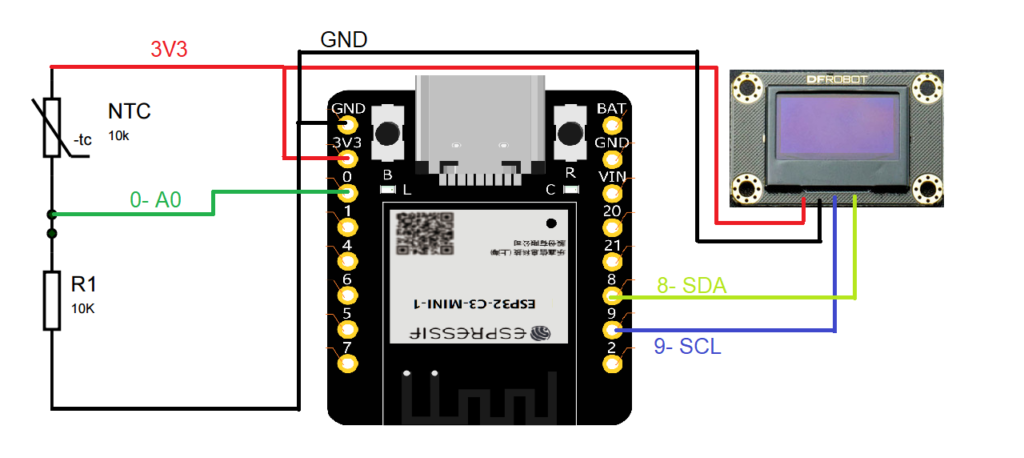
Faremos um exemplo utilizando uma entrada analógica (termistor NTC) e uma porta i2c (display gravity OLED 128×64). Monstraremos a temperatura ambiente no display OLED, para isso faça as ligações abaixo.
O sensor NTC será de 10k Ohm (a 25ºC) e o resistor série também de 10k Ohm, conjunto alimentado com 3,3V. O display OLED utiliza apenas os dois fios da i2c e alimentação de 3,3V.
O código é uma mescla de outros que escrevi no passado, como por exemplo sobre termistor NTC e sobre display OLED. Leio o sensor termistor NTC a cada dois (2) segundos e atualizo o display.
#include <SPI.h>
#include <Wire.h>
#include <Adafruit_GFX.h>
#include <Adafruit_SSD1306.h>
#define OLED_RESET -1
Adafruit_SSD1306 display(OLED_RESET);
#define LOGO16_GLCD_HEIGHT 64
#define LOGO16_GLCD_WIDTH 128
long currenttime;
long oldtime;
// Thermistor connection pin
const int pinThermistor = A0;
// Thermistor parameters
const double beta = 3950.0;
const double r0 = 10000.0;
const double t0 = 273.0 + 25.0;
const double rx = r0 * exp(-beta/t0);
// physical parameters
const double vcc = 3.28;
const double R = 9810.0;
// number of readings for each output result
const int nReadings = 5;
void setup() {
Serial.begin(115200);
// put your setup code here, to run once:
// by default, we'll generate the high voltage from the 3.3v line internally! (neat!)
display.begin(SSD1306_SWITCHCAPVCC, 0x3C); // initialize with the I2C addr 0x3D (for the 128x64)
// init done
// Show image buffer on the display hardware.
// Since the buffer is intialized with an Adafruit splashscreen
// internally, this will display the splashscreen.
display.display();
delay(2000);
// Clear the buffer.
display.clearDisplay();
}
void loop() {
// put your main code here, to run repeatedly:
currenttime= micros();
if(currenttime - oldtime > 2000000){
oldtime= micros();
// Read the sensor a couple of times
int sum = 0;
for (int i = 0; i < nReadings; i++) {
sum += analogRead(pinThermistor);
delay (50);
}
// Determine the resistance
double v = (vcc*sum)/(nReadings*4096.0);
double rt = (vcc*R)/v - R;
// Calculate temperature
double t = beta / log(rt/rx);
t= t-273;
//Serial.println(v);
display.clearDisplay();
display.setTextSize(1);
display.setTextColor(WHITE);
display.setCursor(0,0);
display.println("Temperature oC:");
display.setCursor(10,16);
display.println(t);
display.display();
}
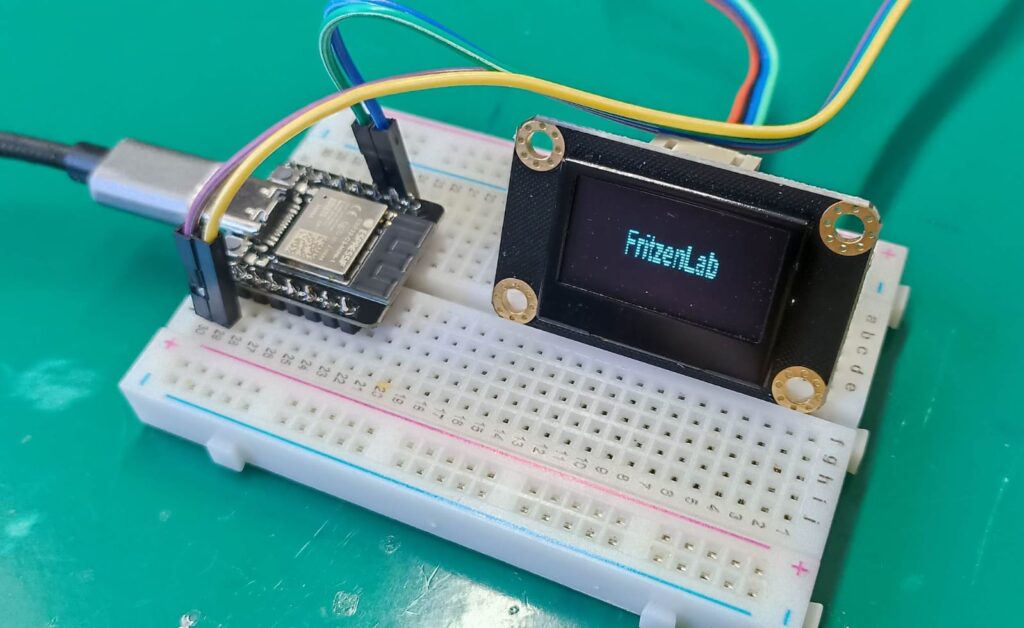
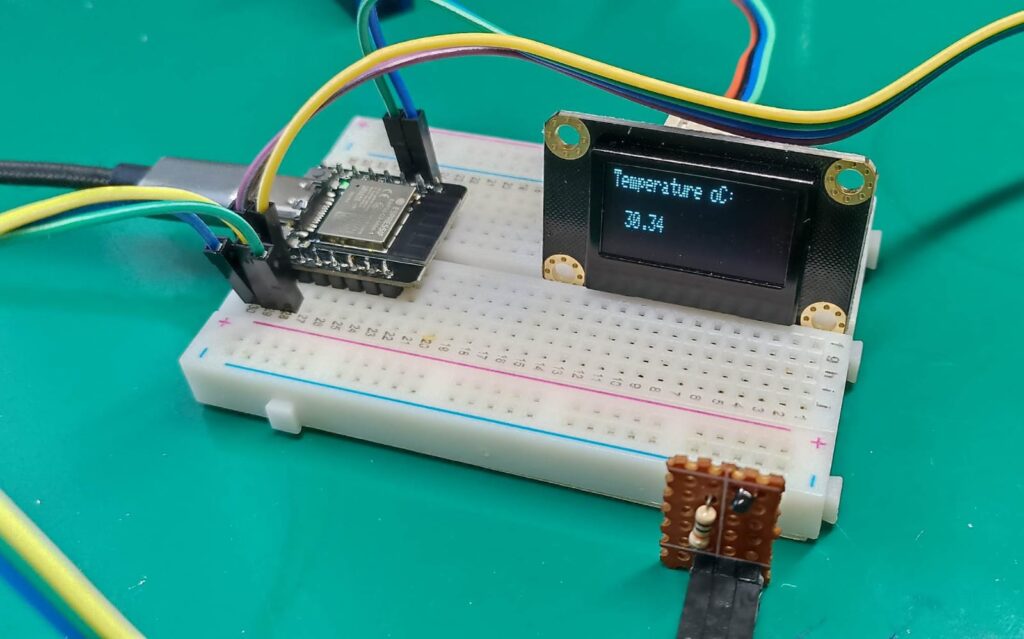
}O circuito montado e funcionando é visto abaixo. Veja na imagem o NTC (em uma plaquinha na parte de baixo), o Beetle ESP32-C3 na protoboard à esquerda e a tela OLED 128×64 á direita.
Conectando ao WiFi
A principal funcionalidade da Beetle ESP32-C3 é obviamente conectar ao WiFi. Primeiramente rodaremos um exemplo que escaneia as redes (os modems) ao redor da sua placa, visto abaixo. O código é o mesmo apresentado na página oficial da minha placa ESP32-C6.
#include "WiFi.h"
void setup() {
Serial.begin(115200);
// Set WiFi to station mode and disconnect from an AP if it was previously connected
WiFi.mode(WIFI_STA);
WiFi.disconnect();
delay(100);
Serial.println("Setup done");
}
void loop() {
Serial.println("scan start");
// WiFi.scanNetworks will return the number of networks found
int n = WiFi.scanNetworks();
Serial.println("scan done");
if (n == 0) {
Serial.println("no networks found");
} else {
Serial.print(n);
Serial.println(" networks found");
for (int i = 0; i < n; ++i) {
// Print SSID and RSSI for each network found
Serial.print(i + 1);
Serial.print(": ");
Serial.print(WiFi.SSID(i));
Serial.print(" (");
Serial.print(WiFi.RSSI(i));
Serial.print(")");
Serial.println((WiFi.encryptionType(i) == WIFI_AUTH_OPEN)?" ":"*");
delay(10);
}
}
Serial.println("");
// Wait a bit before scanning again
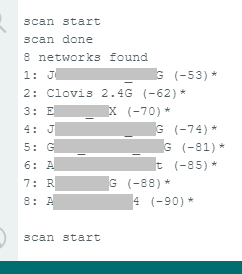
delay(5000);A saída no monitor serial aqui na minha localização é a seguinte, foram encontrados oito (8) modems WiFi.
Buscando informações do tempo via WiFi
Buscaremos informações de tempo na sua localidade a partir do serviço “Open weather map”, baseados neste artigo. Primeiramente faça seu cadastro em https://openweathermap.org/ para obter sua API key. Então copie o código abaixo para sua IDE do Arduino, se atentando para alterar suas configurações de WiFi e sua API key do Open weather map. Altere também o nome da cidade e sigla do país.
/*
  Rui Santos
  Complete project details at Complete project details at https://RandomNerdTutorials.com/esp32-http-get-open-weather-map-thingspeak-arduino/

  Permission is hereby granted, free of charge, to any person obtaining a copy
  of this software and associated documentation files.

  The above copyright notice and this permission notice shall be included in all
  copies or substantial portions of the Software.
*/

#include <WiFi.h>
#include <HTTPClient.h>
#include <Arduino_JSON.h>

const char* ssid = "yourSSID";
const char* password = "yourWifipassword";

// Your Domain name with URL path or IP address with path
String openWeatherMapApiKey = "yourApikey";
// Example:
//String openWeatherMapApiKey = "bd939aa3d23ff33d3c8f5dd1dd435";

// Replace with your country code and city
String city = "nameofyourcity";
String countryCode = "yourcountryhandle(e.g BR)";

// THE DEFAULT TIMER IS SET TO 10 SECONDS FOR TESTING PURPOSES
// For a final application, check the API call limits per hour/minute to avoid getting blocked/banned
unsigned long lastTime = 0;
// Timer set to 10 minutes (600000)
//unsigned long timerDelay = 600000;
// Set timer to 10 seconds (10000)
unsigned long timerDelay = 10000;

String jsonBuffer;

void setup() {
  Serial.begin(115200);

  WiFi.begin(ssid, password);
  Serial.println("Connecting");
  while(WiFi.status() != WL_CONNECTED) {
    delay(500);
    Serial.print(".");
  }
  Serial.println("");
  Serial.print("Connected to WiFi network with IP Address: ");
  Serial.println(WiFi.localIP());

  Serial.println("Timer set to 10 seconds (timerDelay variable), it will take 10 seconds before publishing the first reading.");
}

void loop() {
  // Send an HTTP GET request
  if ((millis() - lastTime) > timerDelay) {
    // Check WiFi connection status
    if(WiFi.status()== WL_CONNECTED){
      String serverPath = "http://api.openweathermap.org/data/2.5/weather?q=" + city + "," + countryCode + "&APPID=" + openWeatherMapApiKey;

      jsonBuffer = httpGETRequest(serverPath.c_str());
      Serial.println(jsonBuffer);
      JSONVar myObject = JSON.parse(jsonBuffer);

      // JSON.typeof(jsonVar) can be used to get the type of the var
      if (JSON.typeof(myObject) == "undefined") {
        Serial.println("Parsing input failed!");
        return;
      }

      Serial.print("JSON object = ");
      Serial.println(myObject);
      Serial.print("Temperature: ");
      Serial.println(myObject["main"]["temp"]);
      Serial.print("Pressure: ");
      Serial.println(myObject["main"]["pressure"]);
      Serial.print("Humidity: ");
      Serial.println(myObject["main"]["humidity"]);
      Serial.print("Wind Speed: ");
      Serial.println(myObject["wind"]["speed"]);
    }
    else {
      Serial.println("WiFi Disconnected");
    }
    lastTime = millis();
  }
}

String httpGETRequest(const char* serverName) {
  WiFiClient client;
  HTTPClient http;

  // Your Domain name with URL path or IP address with path
  http.begin(client, serverName);

  // Send HTTP POST request
  int httpResponseCode = http.GET();

  String payload = "{}";

  if (httpResponseCode>0) {
    Serial.print("HTTP Response code: ");
    Serial.println(httpResponseCode);
    payload = http.getString();
  }
  else {
    Serial.print("Error code: ");
    Serial.println(httpResponseCode);
  }
  // Free resources
  http.end();

  return payload;
}
Se você for deixar o código rodando, atente-se ao número máximo de requisições que você pode fazer no modo gratuíto. São 60 chamadas/leituras por minuto.

Acima vemos o resultado da consulta que fizemos no OpenWeatherMap com o ESP32-C3, para a cidade de Joinville (SC). Observe a temperatura de 292.1, está em Kelvin e significa 19,95 graus Celsius.
Para finalizar
A placa Beetle ESP32-C3 da DFRobot é pequena, compacta e cheia de recursos. Carregamento de bateriais de lítio, comunicações WiFi e Bluetooth são apenas alguns deles. Caso queira adquiri-la, clique neste link.
Espere por mais artigos com esta pequena plaquinha no futuro.


